Nmap has earned its place as a staple in the cybersecurity toolkit. From vulnerability scanning to network discovery, the utility of Nmap can’t be overstated, especially for penetration testers. In fact, the CompTIA PenTest+ certification exam specifically includes objectives that require practical knowledge of how to use Nmap efficiently and responsibly.
This first part of the series focuses on two primary categories of Nmap flags: Scanning Flags and Host Discovery Flags. These flags allow you to extract vital reconnaissance data and structure your penetration tests with precision. Whether you’re studying for PenTest+, performing a red team assessment, or just exploring what Nmap can do, this breakdown will equip you with actionable insights and practical command examples.
Let’s dive into why these flags matter, how to use them, and when each flag is most effective.
What Are Nmap Flags?
At its core, Nmap (Network Mapper) is a command-line tool that scans networks to discover live hosts, open ports, services running on those ports, operating system information, and more. The commands you issue are customized using flags, or command-line parameters, that tell Nmap exactly what actions to perform.
Each flag starts with a hyphen and enables specific functionality, from scanning protocols and port ranges to bypassing security measures or modifying output formats.
Learning to use flags correctly will unlock the full potential of Nmap and help you pass the PenTest+ exam with confidence.
Why Flags Matter for Penetration Testing
Penetration testing is all about controlled attacks. The purpose is to find weaknesses before malicious actors do. During this process, flags give pentesters the flexibility to:
- Choose between stealthy or loud scans
- Target specific hosts or ports
- Control scan speeds and output types
- Avoid detection by firewalls or intrusion detection systems
In other words, flags determine the scope, stealth, and success of your scans.
Let’s start with scanning flags, which form the foundation of any Nmap-driven assessment.
Nmap Scanning Flags: A Deep Dive
Scanning flags are designed to identify open, closed, filtered, or unfiltered ports on the target system. These flags are usually written in the format -sX, where X is a capital or lowercase letter representing the type of scan.
Common Scanning Flags
-sS (TCP SYN Scan)
Also called the “stealth scan”, this is the most widely used flag. It sends a SYN packet to the target and waits for a SYN-ACK response to determine if a port is open. Since it never completes the TCP handshake, it’s harder to detect by firewalls or IDS.
When to Use:
When you want stealth and speed. It’s ideal for reconnaissance where avoiding detection is important.
Command Example:
nmap -sS scanme.nmap.org
-sT (TCP Connect Scan)
This flag performs a full TCP handshake. It’s less stealthy but easier to use since it doesn’t require raw socket privileges.
When to Use:
When running Nmap on Windows or when stealth is not required. Useful for internal network testing.
Command Example:
nmap -sT 192.168.1.1
-sU (UDP Scan)
UDP scanning is slower and less reliable than TCP but critical because many services operate over UDP (e.g., DNS, SNMP).
When to Use:
When you want to discover exposed UDP services. Note that results may be incomplete without elevated privileges.
Command Example:
nmap -sU 192.168.1.1
-sA (TCP ACK Scan)
This flag determines if a firewall is stateful and whether ports are filtered. It sends ACK packets and reads the responses.
When to Use:
To map out firewall rules and packet filtering behavior.
Command Example:
nmap -sA 192.168.0.1
Why Are Scanning Flags Important?
- Reveal attack surfaces by identifying open or vulnerable ports.
- Evade detection by choosing less intrusive scan types.
- Collect OSI Layer 4 data to inform deeper assessments.
Each scan type has strengths and limitations, and choosing the right one often depends on your goals and environment.
Nmap Host Discovery Flags: Know Your Network
While scanning flags focus on port discovery, host discovery flags identify which systems are active on the network. This is a vital first step in mapping out your attack surface.
Common Host Discovery Flags
-Pn (No Ping)
Disables pinging and assumes all hosts are up. Useful in networks where ICMP is blocked or stealth is a priority.
When to Use:
When ICMP is filtered or firewalls block ping traffic.
Command Example:
nmap -Pn 10.10.0.0/24
-sn (Ping Scan / No Port Scan)
Performs host discovery without scanning ports. It sends ICMP echo requests or ARP requests to check if hosts are online.
When to Use:
To quickly see which hosts are alive before a detailed scan.
Command Example:
nmap -sn 10.0.0.1-50
-PR (ARP Scan)
Sends ARP requests on local Ethernet to identify live hosts. It is extremely fast and accurate on LANs.
When to Use:
On local subnets where you want rapid and precise host detection.
Command Example:
nmap -PR 192.168.1.0/24
-n (No DNS Resolution)
This skips DNS resolution for faster scans and fewer artifacts.
When to Use:
When DNS names are irrelevant or when you want to speed up the process.
Command Example:
nmap -n scanme.nmap.org
Why Are Host Discovery Flags Important?
- Let you scan only active systems, saving time and reducing noise.
- Help avoid alerting IDS and firewalls with ICMP or DNS-based scans.
- Provide accurate asset mapping before launching deeper tests.
Penetration testers often start with host discovery, then refine their scope using scanning and version detection flags.
Port Specification and Service Detection Flags for PenTest+ and Real-World Scenarios
Nmap Flag Guide series, we covered the fundamentals of Scanning Flags and Host Discovery Flags, two essential components for identifying live systems and understanding open ports. Now that you’ve seen how to scan and discover hosts on a network, it’s time to take the next step: targeting specific ports and identifying services and their versions using the power of Port Specification Flags and Service Detection Flags.
These flags are crucial for penetration testers, especially those preparing for the CompTIA PenTest+ certification, where Nmap usage is an explicit exam objective. Port-focused and service-level reconnaissance allow you to get detailed insights into the target environment’s functionality and vulnerability footprint, insights you’ll use to pivot, exploit, or escalate privileges.
Let’s explore how these flag categories work, when to use them, and what commands you need to know to maximize their effectiveness.
Port Specification Flags: Target with Precision
Port Specification Flags help you control the range and type of ports Nmap scans. Rather than scanning all 65,535 ports (which can be slow and noisy), these flags allow you to narrow your scope to what matters most.
This is helpful when:
- You want to reduce scan time
- You’re checking for a specific vulnerability tied to a certain port
- You’re validating firewall or filtering behavior
- You’re emulating a stealthier engagement in a real-world pentest
Key Port Flags and Their Use Cases
-p (Port Range)
The -p flag lets you scan specific ports or a range of ports. This saves time and helps focus your efforts on services of interest.
Examples:
bash
CopyEdit
nmap -p 22,80,443 192.168.1.1
Scans ports 22 (SSH), 80 (HTTP), and 443 (HTTPS).
bash
CopyEdit
nmap -p 1-1024 192.168.1.1
Scans all well-known ports.
When to Use:
When you know what ports your target typically uses or want to test specific service ports quickly.
-p-
This is shorthand for scanning all 65,535 TCP ports.
Example:
bash
CopyEdit
nmap -p- scanme.nmap.org
When to Use:
When you need to be thorough and cannot afford to miss any listening services—though slower, it’s very comprehensive.
-F (Fast Scan)
This flag scans the most commonly used 100 ports, based on Nmap’s internal database.
Example:
bash
CopyEdit
nmap -F 10.10.10.10
When to Use:
When you need quick, high-probability reconnaissance without the wait.
Why Port Specification Flags Matter
- Help you work smarter, not harder, by skipping unnecessary ports
- Reduce noise during stealth assessments
- Focus your exploits by identifying just the ports you need
- Save resources in wide-scope scans or time-limited engagements
For PenTest+ students, knowing how to use -p, -p-, and -F will often make or break the success of a timed exam lab.
Service Detection Flags: What’s Behind Those Ports?
Once you’ve discovered open ports, the next step is to identify what services are running and what versions they’re using. That’s where Service Detection Flags come in. These flags are your pathway to vulnerability identification, fingerprinting, and eventual exploitation.
Knowing the service version helps you:
- Match services to known CVEs (Common Vulnerabilities and Exposures)
- Decide on payloads for exploits
- Understand what OS and software stack you’re dealing with
- Detect misconfigurations or legacy software
Key Service Detection Flags
-sV (Service Version Detection)
This is the most important flag for identifying the services running on open ports and their version numbers.
Example:
bash
CopyEdit
nmap -sV -p 21,22,80,443 192.168.0.100
This tells you whether FTP, SSH, HTTP, and HTTPS services are running, and which versions.
When to Use:
Always use this flag when you want detailed service banners and fingerprints. Ideal for mapping attack surfaces.
-A (Aggressive Scan)
The -A flag combines several flags under the hood:
- -O (Operating System detection)
- -sV (Service version detection)
- –traceroute
- –script=default
It’s an all-in-one flag for comprehensive recon.
Example:
bash
CopyEdit
nmap -A 192.168.1.100
When to Use:
When you want maximum data quickly during a reconnaissance phase, or during red team simulations where time matters.
-O (OS Detection)
This identifies the operating system running on the target by analyzing TCP/IP stack behavior and packet responses.
Example:
bash
CopyEdit
nmap -O scanme.nmap.org
When to Use:
To tailor exploits to the target’s OS or to evaluate platform-specific vulnerabilities.
Aggressive vs Stealthy Scanning
Be aware that using flags like -A, -sV, or -O can be loud. These scans send a lot of packets and are easily flagged by Intrusion Detection Systems (IDS).
For stealth or red team testing, consider combining more selective flags like:
bash
CopyEdit
nmap -sS -p 80,443 –version-intensity 2 192.168.1.1
This command performs a stealthy TCP SYN scan on web ports and does light version detection.
Nmap in Action: Sample Scenarios
Let’s look at a few examples where combining port and service detection flags results in actionable reconnaissance.
Scenario 1: Internal Web Application Recon
You’re scanning a web app server to evaluate exposed HTTP services.
bash
CopyEdit
nmap -sS -sV -p 80,443,8080 -oN webscan.txt 192.168.1.50
- -sS: Stealth scan
- -sV: Get HTTP version info
- -p 80,443,8080: Focus on known web ports
- -oN: Save output in normal format
You’ll get information about web server type (e.g., Apache or nginx), version number, and whether HTTPS is supported.
Scenario 2: Network Enumeration in Time-Constrained Assessment
You have only 30 minutes to identify vulnerable systems.
bash
CopyEdit
nmap -F -sV -oG fastscan.gnmap 10.0.0.0/24
- Fast scan of top ports across the subnet
- Captures service info quickly
- Greppable output for use in Bash parsing
Scenario 3: Full OS and Service Fingerprinting
You’re gathering as much intelligence as possible during an authorized penetration test.
bash
CopyEdit
nmap -A -p- -oA full_recon 10.10.10.10
- Aggressive scan, all ports
- Includes OS detection, traceroute, scripts
- Outputs to normal, XML, and grep formats
Using Exam-Labs to Master Nmap Flags for PenTest+
The CompTIA PenTest+ (PT0-002) exam includes questions that test your ability to:
- Understand and apply scanning flags
- Interpret Nmap output
- Recognize scenarios where specific flags are appropriate
Exam-Labs provides a wide range of practice questions, scenario-based quizzes, and interactive test simulations that mirror the exam environment. Their updated content helps you:
- Reinforce flag combinations through realistic challenges
- Understand the practical differences between scan types
- Test your knowledge of when to use each flag under pressure
With Exam-Labs, you’re not just memorizing syntax, you’re learning to think like a pentester.
Best Practices for Port and Service Detection
- Use -p to limit your scan scope and reduce scan time
- Always follow -p with -sV to identify services
- Use -F for quick surveys and live host discovery
- Apply -A carefully—aggressive scans can be detected
- For public targets like scanme.nmap.org, be respectful and limited in use
Output Format Flags and Documentation Essentials for PenTest+ and Real-World Scenarios
In penetration testing, running powerful tools like Nmap is just the beginning. What separates an average scan from a truly professional engagement, or a successful PenTest+ certification pass, is how well you document and communicate your findings.
That’s where Nmap’s Output Format Flags become crucial. These flags allow you to capture scan results in multiple formats, integrate them into other tools, and build reports that make your work actionable and understandable to both technical teams and decision-makers.
In Part 3 of our series, we’ll dive into Nmap’s output options and examine how to turn raw scan data into structured insights, ideal for PenTest+ objectives and real-world pentesting.
Why Output Matters in Penetration Testing
Output formatting is often underestimated, but in any real pentest or certification scenario, it’s a required skill.
- During the CompTIA PenTest+ exam, you may need to interpret or create reports based on Nmap output.
- In real-world jobs, clients and employers expect comprehensive documentation that explains not just what you scanned, but what you found and what it means.
By using Nmap’s output flags strategically, you’ll not only improve your productivity but also deliver professional-grade results.
The Main Output Format Flags in Nmap
Nmap offers several ways to record your scan results using output flags. Let’s explore the most essential ones.
-oN: Normal Output Format
This saves the scan output in a readable, plain-text format that’s similar to what you see directly in the terminal.
Example:
bash
CopyEdit
nmap -sV -oN internal_network.txt 192.168.1.1
Use Case:
- Human-friendly format for report writing
- Easy to copy/paste into documents
- Good for manual review and explanation
-oX: XML Output
The XML format creates a machine-readable output that can be parsed by other tools and scripts.
Example:
bash
CopyEdit
nmap -sV -oX output.xml scanme.nmap.org
Use Case:
- Perfect for importing into SIEM platforms or vulnerability scanners
- Can be used with tools like Metasploit for automation
- Scriptable and structured
-oG: Grepable Output
This is a simplified format for quick parsing with command-line tools like grep, awk, or sed.
Example:
bash
CopyEdit
nmap -sV -oG open_ports.gnmap 192.168.0.0/24
Use Case:
- Quickly extract open ports, IPs, or banners
- Combine with bash scripts for mass analysis
- Great for filtering on specific results like HTTP services
-oA: All Output Formats
This is one of the most useful flags. It creates all three output types, normal, XML, and grepable, in one go.
Example:
bash
CopyEdit
nmap -A -p 22,80,443 -oA company_network 192.168.10.0/24
Output Files:
- company_network.nmap (normal text)
- company_network.xml (XML structured data)
- company_network.gnmap (grepable format)
Use Case:
- Ideal for thorough documentation
- Useful in client-facing projects
- Helps maintain detailed, accessible records for review or audits
Adding Timestamps and Labels to Output
For organized reporting and versioning, you can add timestamps or context to output file names.
Example:
bash
CopyEdit
nmap -sS -oA pentest_scan_$(date +%F) 192.168.1.100
This command produces:
- pentest_scan_2025-04-15.nmap
- pentest_scan_2025-04-15.xml
- pentest_scan_2025-04-15.gnmap
Sample Scenario: Enterprise Port Audit
Let’s say you’re conducting a port audit across 50 internal systems. You want to identify all open ports on common service ranges and save the results for further analysis.
bash
CopyEdit
nmap -sS -sV -T3 -p 1-1024 -oA internal_audit 10.0.0.1-50
What this does:
- -sS: Stealth scan
- -sV: Service version detection
- -T3: Balanced timing
- -p 1-1024: Common ports
- -oA internal_audit: Full output set
Later, you can feed internal_audit.xml into reporting software or use grep on the .gnmap file to extract all systems with open FTP or SSH.
Using Output for Reporting
Most organizations require detailed reports on penetration tests. This includes:
- Executive Summary: Brief findings and business impact
- Technical Details: Scan scope, commands used, IPs, ports, and services discovered
- Screenshots or Raw Logs: Normal or grepable outputs
- Recommendations: Based on vulnerabilities discovered
You can copy relevant portions of -oN files into the report or process -oX output into Excel or Word tables using conversion tools.
Integrating Output With Other Tools
Here’s how output from Nmap becomes a central source of data for other tools:
- Metasploit: You can import -oX results to plan module use
- Nessus: Cross-reference service versions and vulnerabilities
- Nikto: Use web ports discovered in .gnmap as input for vulnerability scans
- Splunk/ELK: Send XML results for centralized analysis
Automating Output Analysis With Scripts
If you’re working in environments with hundreds of IPs, automation is key. Use -oG output for scripting.
Example Bash Script:
bash
CopyEdit
grep “open” company_scan.gnmap | cut -d ” ” -f 2,4
This simple command shows all IPs with open ports in one clean list.
Best Practices for Output Flag Use
- Always include -oA in final or client scans
- Save results with clear names and timestamps
- Back up your .nmap, .xml, and .gnmap files
- If using output in public reports, sanitize sensitive info
- Convert XML to CSV for executive-friendly summaries
PenTest+ Exam Preparation Tip
The CompTIA PenTest+ PT0-002 exam may include questions like:
- “Which Nmap flag would you use to generate output in XML format?”
- “You need to quickly filter results for ports 80 and 443. Which flag would help?”
Using platforms like Exam-Labs, you can practice these scenarios with sample Nmap output. They offer realistic test simulations to reinforce flag comprehension and exam timing.
Real-World Output Reporting Structure
When preparing a penetration testing report using Nmap output, include:
- Command run (with flags)
- Summary table of IPs and open ports
- List of detected service versions
- Potential vulnerabilities based on banner info
- Appendix with output file names and hashes
Advanced Timing, Evasion, and Nmap Scripting Engine (NSE) for PenTest+ and Professional Use
In the previous parts of our Nmap Flag Guide, we explored scanning, host discovery, port and service detection, and output formatting. With those building blocks, you can already conduct detailed reconnaissance for real-world penetration testing and CompTIA PenTest+ certification scenarios. But Nmap is more than just a port scanner, it’s a flexible penetration testing framework.
In this final part, we’ll focus on advanced Nmap techniques including timing and evasion flags, and the highly powerful Nmap Scripting Engine (NSE). These features allow you to perform stealth scans, evade detection, and even conduct vulnerability analysis, all from the Nmap command line.
Let’s explore how these flags help you stay under the radar during red team engagements, simulate real-world attacks for PenTest+ prep, and extract deep insights from network environments.
Why Timing and Evasion Matter in Penetration Testing
Many enterprise networks are equipped with Intrusion Detection Systems (IDS), firewalls, and endpoint security that can flag or block Nmap scans. These systems often detect repetitive patterns or bursts of activity. If you scan too quickly or use noisy defaults, you’ll trigger alerts.
This is where timing and evasion flags come in. They help you:
- Control scan speed
- Randomize scan order
- Spoof source addresses
- Fragment packets
- Blend into network traffic
Used correctly, these flags can allow you to remain undetected longer, helping you emulate real threat actors or complete your scan before getting blocked.
Timing Templates: The -T Flag
The -T flag allows you to set scan timing and aggressiveness, ranging from stealthy to super fast.
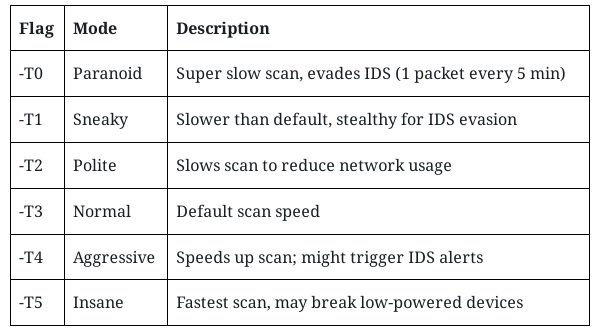
Example:
bash
CopyEdit
nmap -sS -T1 -oA stealth_scan 192.168.1.100
Use Case:
- Use -T0 or -T1 when you suspect security monitoring.
- Use -T4 or -T5 for internal assessments where speed is key.
Evasion Flags for IDS and Firewall Bypass
When you’re dealing with hardened networks, consider these flags:
-f (Fragment Packets)
This flag splits scan packets into smaller pieces, making it harder for packet inspection tools to reassemble and detect them.
Example:
bash
CopyEdit
nmap -sS -f 192.168.1.1
Warning: May break or confuse firewalls and network devices—use with caution.
–mtu (Set MTU for Packet Size)
Sets the maximum transmission unit for packet fragmentation.
Example:
bash
CopyEdit
nmap –mtu 32 192.168.1.1
Smaller packets reduce detection, but might also reduce scan accuracy.
–data-length
Appends random data to packets, confusing some IDS tools.
Example:
bash
CopyEdit
nmap –data-length 50 192.168.1.1
-D (Decoy Mode)
Spoofs additional decoy IP addresses, making it harder to determine which IP is the real source.
Example:
bash
CopyEdit
nmap -sS -D 10.0.0.5,10.0.0.6,ME 192.168.1.1
Adds two fake decoy IPs plus “ME” (your actual IP).
-S (Spoof Source Address)
Sends packets from a spoofed source IP. Only useful if you control the routing.
Example:
bash
CopyEdit
nmap -S 10.0.0.99 192.168.1.1
Requires elevated privileges and careful routing setup.
–source-port
Sends packets from a specific source port, such as 53 (DNS) to bypass firewalls.
Example:
bash
CopyEdit
nmap -sS –source-port 53 192.168.1.1
Some firewalls whitelist certain ports, so this flag helps test rule evasion.
Nmap Scripting Engine (NSE): Extend Your Capabilities
One of Nmap’s most powerful features is the Nmap Scripting Engine (NSE), which lets you run custom or predefined scripts for:
- Service enumeration
- Vulnerability detection
- Authentication brute forcing
- Exploit simulation
- Malware and misconfiguration detection
Scripts are stored in /usr/share/nmap/scripts/ or can be browsed online.
Running NSE Scripts: -sC and –script
-sC
Runs the default script set, which includes useful detection scripts.
Example:
bash
CopyEdit
nmap -sC 192.168.1.1
Includes scripts for:
- HTTP title detection
- SMB enumeration
- SSH version grab
- DNS queries
–script
Specifies one or more custom scripts by name or category.
Example:
bash
CopyEdit
nmap –script http-vuln-cve2021-26855 -p 443 192.168.1.1
Categories Include:
- auth
- brute
- default
- discovery
- dos
- exploit
- external
- malware
- safe
- vuln
–script-args
Use this to pass arguments to NSE scripts.
Example:
bash
CopyEdit
nmap –script http-brute –script-args userdb=users.txt,passdb=passwords.txt -p 80 192.168.1.1
Brute-forces web login using custom credential lists.
–script-help
Displays help info for a specific script.
bash
CopyEdit
nmap –script-help smb-os-discovery
Practical NSE Script Examples
Vulnerability Check:
bash
CopyEdit
nmap –script vuln 192.168.1.100
This runs all scripts in the “vuln” category. Useful for a lightweight vuln scan.
Heartbleed Detection:
bash
CopyEdit
nmap -p 443 –script ssl-heartbleed 192.168.1.1
Identifies whether the target is vulnerable to the infamous OpenSSL bug.
HTTP Enumeration:
bash
CopyEdit
nmap –script http-enum -p 80 192.168.1.10
Lists web directories and potentially sensitive endpoints.
Nmap Timing, Evasion, and NSE for PenTest+
In the CompTIA PenTest+ exam, you may encounter:
- Scenario-based questions asking you to choose the best timing flag
- Output interpretation requiring NSE results
- Use-case matching (e.g., which flag avoids ICMP detection?)
Exam-Labs provides simulated labs and test questions that help you practice:
- Choosing appropriate flags under constraints
- Reading NSE output
- Analyzing scan success and stealth level
- Running scripts during the recon or vulnerability phases
Real-World Pentest Strategy: A Combined Example
bash
CopyEdit
nmap -sS -sV -T2 -f -D 192.168.1.10,192.168.1.11,ME –script vuln -oA stealth_report 10.0.0.1-10
What this command does:
- Stealthy TCP SYN scan
- Detects service versions
- Slows down scan for stealth
- Fragments packets for evasion
- Spoofs decoy IPs
- Runs all vulnerability scripts
- Saves results in all formats
Use Case:
Ideal for simulating a red-team stealth scan in a controlled pentest environment or a timed lab exam.
Final Tips for Mastering Advanced Flags
- Combine -T with –data-length for stealth
- Use NSE scripts to reduce reliance on other tools
- Always read NSE script documentation before using
- Save your results with -oA for full post-scan analysis
- Practice scan customization in lab environments like TryHackMe, Hack The Box, or your home lab
Final Thoughts on Nmap Mastery
Over the course of this four-part guide, we’ve covered every major flag category in Nmap. From simple host discovery and port scanning to output formatting, scripting, and evasion, these flags form the core of penetration testing reconnaissance.
Nmap isn’t just a tool for basic scans, it’s a versatile, scriptable, and powerful ally for ethical hackers, IT auditors, network engineers, and PenTest+ candidates.
Master these flags, and you’ll be able to:
- Conduct professional security assessments
- Pass PenTest+ with confidence
- Customize your approach for any security challenge